Saturday 4 July 2009

NEXT WILL BE


CATHEDRAL WINDOW
MY WAY
+
SECRET GARDEN

Saturday 6 June 2009

THE FINISHED CORDED POSTCARDS

Here are all the cards made using the samples done in the previous post.
I hope you feel they look good now they are completely finished.
I am rather pleased with the way they turned out.


If you remember, the one on the left was 'short'
I just added a nice wide ribbon for a bit of glitz and of course
to finish the card off,
The 'gold' one on the right, I also added some ribbon, just for fun,
then I did some quilting in between the channels, again,
just for fun.


I do hope you will have a go at this technique
Just a thought......
Why not use something other than 100% Cotton,
Silk or a shiny satin would give lovely raised channels
Ohh
I may just have to have a go at this myself

CORDED QUILTING

This Technique is generally known as ITALIAN CORDED QUILTING, as a very soft thick cream wool is used for filling the channels made, the wool is, I believe, Italian. It is fairly expensive, so I would suggest you don't use it for a Postcard, unless of course you wish to. I use all sort of things, but not that as you will see.

Fabrics for the Postcard -
Background Cotton fabrics and muslin, --also known as cheesecloth
NO WADDING NEEDED FOR THIS METHOD,


the muslin [cheesecloth] goes behind the top fabric, two rows of stitching are done,
you can use a twin needle if you are happy with those, I just used the edge
of the foot to judge the distance, to show you it is not necessary to have
anything extra to what you already have for your machine...


see - here I am pointing that fact out...


just merrily stitch some pairs of lines, as many as you wish,
in whatever design you wish,
these were very random...
I also used different threads in the machine, because;
I felt like it...


Here are the things I am going to use to stuff the channels,
as you can see I have lots of different wools, scraps of voile even...


ribbons, plain wools, fancy wools...


you need a wool needle or a bodkin it used to be called, it has to
be able to be threaded and passed through the narrow channels you have just sewn...


you thread from the BACK, through the muslin, just poke the needle
in the muslin to create a hole, and thread away,
BUT
NOT SO THIS HAPPENS...


just go the length of the needle then poke through the muslin again,
bring the needle back up, leave a little loop - only a little one, then go back in
the muslin and continue on your merry way,
until you get to the end of the line...
I think that is a song by the Wilberry's


see, like this...


length of the needle then up...


will look like this when you have done a row,
OK this is exaggerated just so you get the idea...


give your fabric a little 'yank' [sorry USA folk]
so
me of the dots will settle into the fabric, this should happen;
Continue threading the needle with various threads,
or all same one, it is your decision to make,
your card will look something like this on the front...


and something like this on the back;
what a mess, I hear you saying,
do not worry, give that little yank, a lot disappears...


here is a different card I have been threading some voile through
the channels, see the difference, YOU MUST use very bright
colours for the threads to show on the front by the way...


here is the back of the 'voiled' card...
I know there is no such word, I just created it...


Yet another showing some cords running through,
real cord this time and I used it triple in the needle to get
the channel filled up...


here is the back of that card,
it looks as though I used fabric on the back of this one,
you can, its just the muslin is a lot easier to poke holes in...


I had made a large piece of fabric for this method, I am now
placing two postcard blanks onto it to see if I can get two from it...


flip over to the front, just to check...


Yep, I managed to get two cards from that one piece of fabric I corded,
Card 1 -
oh look, it is a bit short on the sides, not to worry see later what I do for that...


Card 2 -


They now need backing with the address fabric then the edges need
finishing off, then they can be posted to whoever.

I do hope this has helped you with the method for this Technique, it is not every bodies
favourite I know, but for a Postcard or two it can be just enough fun.
Enjoy
~~~~~~~~~~~~~~~~~~~~~~~~~~~~~~~~~~~~~~~~~~~

Friday 5 June 2009

THE COMPLETED CARD

Here is the completed SHADOW QUILTED card ready for posting if I wish.


Tuesday 26 May 2009

SHADOW APPLIQUE

TUTORIAL FOR SHADOW APPLIQUE

In my role as Moderator for FABRICARDS, see link to join this group on the right...
I have been given one of the swaps to organise in the Database.
My first swap I chose to be a Technique
- Shadow Applique/Quilting -
Here then, is a tutorial of how I do this,
there will be other places to see this done by experts of course,
but this is to give you the quick lowdown on it.
I have made deliberate mistakes on this to show you the common pitfalls when doing this technique, off we go then..

This is my base fabric,
I do actually place a piece of wadding behind,
I just forgot it on this photo...


The next two pictures are showing you how the fabric dulls down
when you place the voile on the top...


These are the three fabrics I shall be using,
these three pictures show you different coloured voile's over the top
and the re-action to the fabrics again...
PINK VOILE.............................BLUE VOILE.........................WHITE VOILE....................

I have cut rectangles from the three fabrics I am going to use
and placed them on the white background, with the wadding/batting underneath that,
I have placed a piece of voile over them,
then, just so you can see the re-action to the colours,
I have put a piece of each of them on the top of the voile,
they will be removed when I sew of course...


Here I have sewn round all three of the shapes,
I have used a block thread so you can see it has to be right up close,
normally I would have used the background fabric colour thread of course,
here is the first error,
a stray thread, can you see it...


another fault- the fabric was frayed at the edge, look close...


another stray thread, albeit a small one,
you still don't want it there...


This sticks out like a sore thumb;
the stitching is too far away from the edge of the fabric under the voile,
if its not right at the edge, the piece underneath can move about,
NOT a good idea...


Here is a stray blob of cotton, you have to check and check again for things like this...


Oh dear, the stitching has gone away from the edge again,
and curved, messy looking isn't it...


Good grief, this time the stitching has
actually gone right onto the little piece of fabric,
this is NOT what you are aiming for,
IF
you are extremely careful you could sew right along the edge,
but that is very difficult to achieve,
so I would suggest you stitch along the outside edge of your shapes.


So there you have it. My tutorial for Shadow Applique. As I said I have done all the errors deliberately for you. You obviously will do them perfectly. It is an amazingly quick technique to do, not sure I would use it in a Quilt, although it would be very pretty.
You can put anything under the voile, a motif you like could be really pretty.
Buttons or beads, just make sure you stitch round them so they don't move.
Also there are so many different shades of voile's these days,
you don't have to stick to white anymore, just be aware of the colour change.
Have fun experimenting with this and look out for stray threads.
~~~~~~~~~~~~~~~~~~~~~~~~~~~~~~~~~~~~~~~~~~~~~

POSTCARD FLOWER POT

HOW DID I MAKE IT?


Here is some information for those of you who would like to make a similar card as this one. Noel I know you would like to do one so here you go.....

The background is a basic Attic Window patchwork block, I just stitched thick lines for the diamond window effect, in a BROWN thread, not black, too harsh. I then satin stitched the other edges.

The flowers were white, I just 'painted' these with felt tips to make them pink, [you can do whatever colour you like of course. I will let you hahahaha Make sure they are well and truly dry before attaching to your card though, particularly if it is white or cream.] They are wired flowers so you can bend them to how you want them to be placed. I used mono filament thread and zigzagged over the stems for a short length.


The flower pot I made with a piece of washing up cloth I bought from the pound shop, it is like thin felt. I first coloured it purple but didn't like it so went over it with brown, dabbing the felt tip on so I got the 'mottled' effect. You could just use a piece of brown felt I guess, but I think this looks nicer. I straight stitched round the pot - not the top though, at least I don't think I did the top!!

The little card - I cut a piece of thin pelmet vilene 1/2" x 1", folded it in half, stuck a piece of fabric on it, then wrote MUM on the front and inside...'with love'.................[you of course can put what you like!! I will let you. hahahaha] I attached this little card to the main part by stitching inside just down the fold, so it stands free as it were.

Then I just finished the card as I do all my others, see tutorial elsewhere on Blog for that info.

TA DA. Finito.

Hope this helps anyone out who wishes to make one. :-)


HOW I MAKE QUILTS

HOW I MAKE QUILTS - START TO FINISH

I am often asked "How do you make your Quilts, and How do you get that huge pile through that small gap on the machine?"

Here then is how I do it, I hope it is of interest and possibly, help, to you. There are other things of interest along the way, you may find useful too.
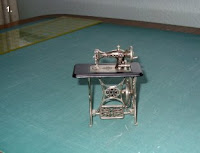


1. Smallest machine I could find!!!...
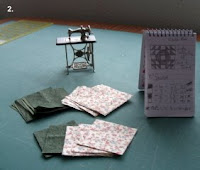
2. The design - Single Wedding Ring or Crown of Thorns, plus the squares cut ready to sew...
3. Making half square triangles...


4. My 'real' machine, this is the only one I have, this makes all my quilts whatever the size...
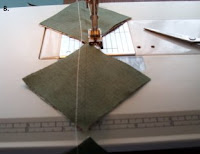
5. Making a half square triangle, using the 'thread savers'...
6. Stitching second seam of half square triangle...
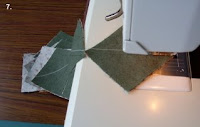


7. Chain piecing the squares, they always fall into a neat pile behind the machine, how helpful...
8. Still chain piecing, but the second seam now...
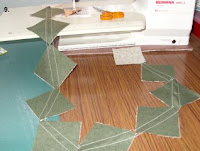
9. Streamers are us, note they are all linked together, see the thread saver too?...


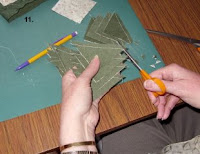
10. Now they have to be cut through the centre line to produce the two squares,
11. Chopping off their ears!! ouch!!!.....this is the way I do it, you don't have to...
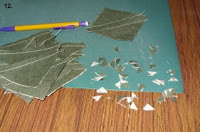
12. What a waste of fabric!! Anyone want these triangles? JOKE!...


13. Pressing the finished squares and look the squares match...amazing!!!!...
14. My homemade mini pressing table;...
15. Its just one of those boards from a bolt of fabric, ask at your shop, they chuck them away...


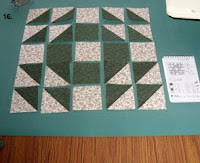
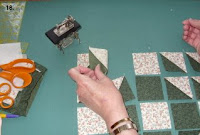
16. Tada! Yep, looks like the picture, always best to lay it out...
17. Pick up the first two squares from top left hand side...
18. Flip over, take to your machine....
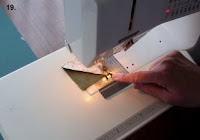


19. Stitch to end, do not remove from machine...
20. Pick up the next pair, flip over, take to machine...
21. Just continue stitching, this is called chain piecing...


22. Stitch to end...
23. Go back, pick up next pair, keep stitching like this, use thread saver when at end, then...
24. You should have this, two rows linked with a little thread, DO NOT CUT APART, can you see the little bit or orange fabric pinned to the top of the left hand square, that is to show you it always has to be in that position, that way you wont turn your quilt by accident, Handy Hint...
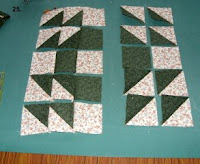


25. Do as before but now you are only picking up one square an attaching to previous row...
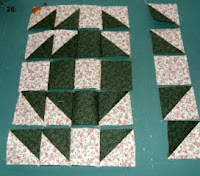
26. Four rows done...
27. All rows done...
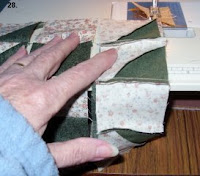


28. Now pick whole thing up, and stitch rows together, across previous stitching..
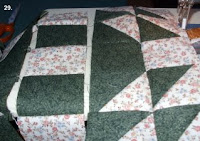
29. Two done..
30. Three done..


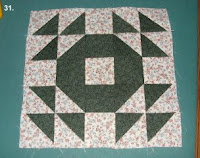
31. All rows joined both ways and pressed..hm mm...
32. That's better give it some borders...
33. Sides stitched on...


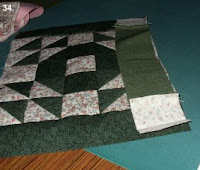
34. Cornerstones stitched to the green bit, ready to attach to quilt...
35. Pressed ready to Quilt...hm mm...
36. How the heck is this big thing gonna fit in that little space?....aha...


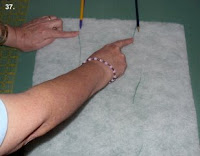
37. Get your HUGE piece of wadding and mark it into thirds, see pencil placements...
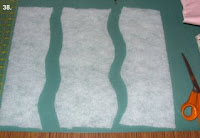
38. Cut long gentle wavy lines one end to the other, DO NOT MOVE THESE...
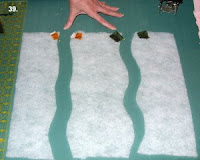
39. Pin on some coloured markers to the tops of the edges of the wadding, different colours, so you will know what piece goes next to what later on, DO NOT FORGET THIS PART...


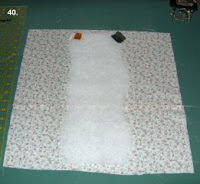
40. Lay the backing of quilt down and place centre portion of wadding on this...
41. Lay your Quilt on top again, see the wadding in the centre...
42. Pin or tack your quilt to within a couple of inches of your wadding, then roll the sides up, tightly, you can, no wadding there, no bulk...


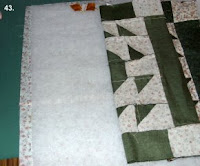
43. Quilt as desired the centre portion, then take pins out, unroll the sides, flip quilt top back,
lay wadding on, put quilt top back, repin, then quilt away...

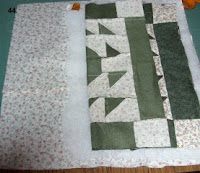
44. Unpin second side, flip quilt top over, put wadding down again, put quilt top back, back to
machine and quilt to hearts content...
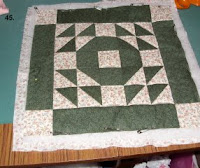
45. Your Quilt is now quilted all over, you didn't have to struggle with it in the small gap, easy
peasy eh?....


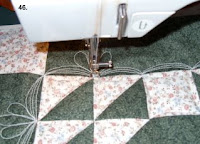
46. Now you can easy Quilt your borders, if they are huge too, quilt them before you move the
sandwich about, I like to do my borders in a continuous line though...
47. Hubby took these piks as I was sewing, not bad are they...
48. Pattern out of my head, no measuring here, no plan, just go for it...
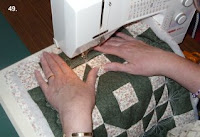


49. 50. 51. All as I was sewing... Yes the petals are all different, I don't mind, do you?...
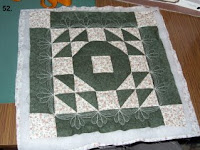


52. All quilted...
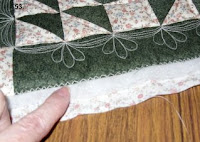
53. I always do a narrowish zigzag around the edges so it stays put for the binding part...
54. Oops, not quilted these squares, don't forget them Janet...


55. That's better...
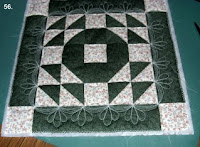
56. Quilted and trimmed ready for the binding, can you see I always cut it 1/4" away from the
edge of the quilt, leave a little of the wadding there, it helps to 'fill' the binding, nothing
worse than 'empty' saggy binding...
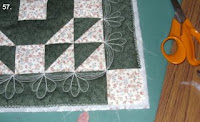
57. This is pointng out to you I joined the backing, I did it so I could show you, if you have to do
that, NEVER EVER have that join across the centre of your Quilt, too much strain for it,
always offset it a bit...


58. Yes, I cut the wadding with my rotary cutter, an old one, but look at the messy board...
59. Good old sellotape, press it on the wadding, rip it off, and...
60. Voila, nice and clean again...HANDY HINT...


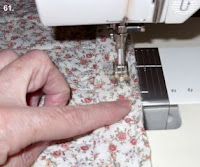
61. Not sure if you can see the line of stitching, I am adding the binding now, putting it on the
back first, remember this is the way I do it, you don't have to; I am stitching about 1/4"
from the edge...
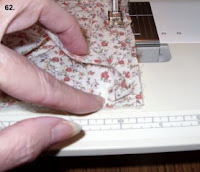
62. and 63. Here is the corner, stop 1/4" from it...


64. Hospital corners, girls, up, down, carry on sewing...
65. This is how I join the binding together, some people mitre it, sometimes I do, not very
often though, OH I also never use bias binding, I always cut on the straight of the grain,
saves a lot of hassle I find, and contains the edges, I never get wavy edges using it
straight, and I always cut it 2 1/4", then fold in half...
66. Binding joint ready to finish off...


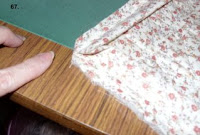
67. More ears trimmed off...
68. Can you see my binding peaking over the wadding?...
69. Mitreing the corner...


70. Don't forget the label on the back...


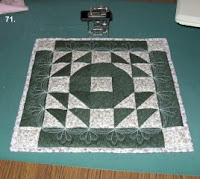
71. One finished Quilt.

OK, so the quilt wasn't sewn with that little machine, I placed it here to show you the size ratio to the machine and the quilt, and no, it's not really a quilt either, it is just a block, but, up against that little machine, it looks like a quilt. Anyway, I didn't fancy getting a huge quilt done in a short space of time for this demo, so hope you will forgive me. This is done for you to see you CAN quilt a HUGE quilt on your domestic machine, just split the wadding, any Quilt, any size, process is the same.
Give it a go, let me know how you get on. Just Quilt it.
This has taken me three days to do, from cutting the fabric to getting it on the computer. WHEW!